
What's Changing in Windows 11's New Start Menu
On October 28, 2025, Microsoft released the optional update KB5067036 introducing a fundamentally redesigned Start menu for Windows 11 versions 24H2 and 25H2. Rather than deploying the feature universally, Microsoft implemented a phased rollout strategy, meaning some users receive the new interface immediately while others wait weeks or months.
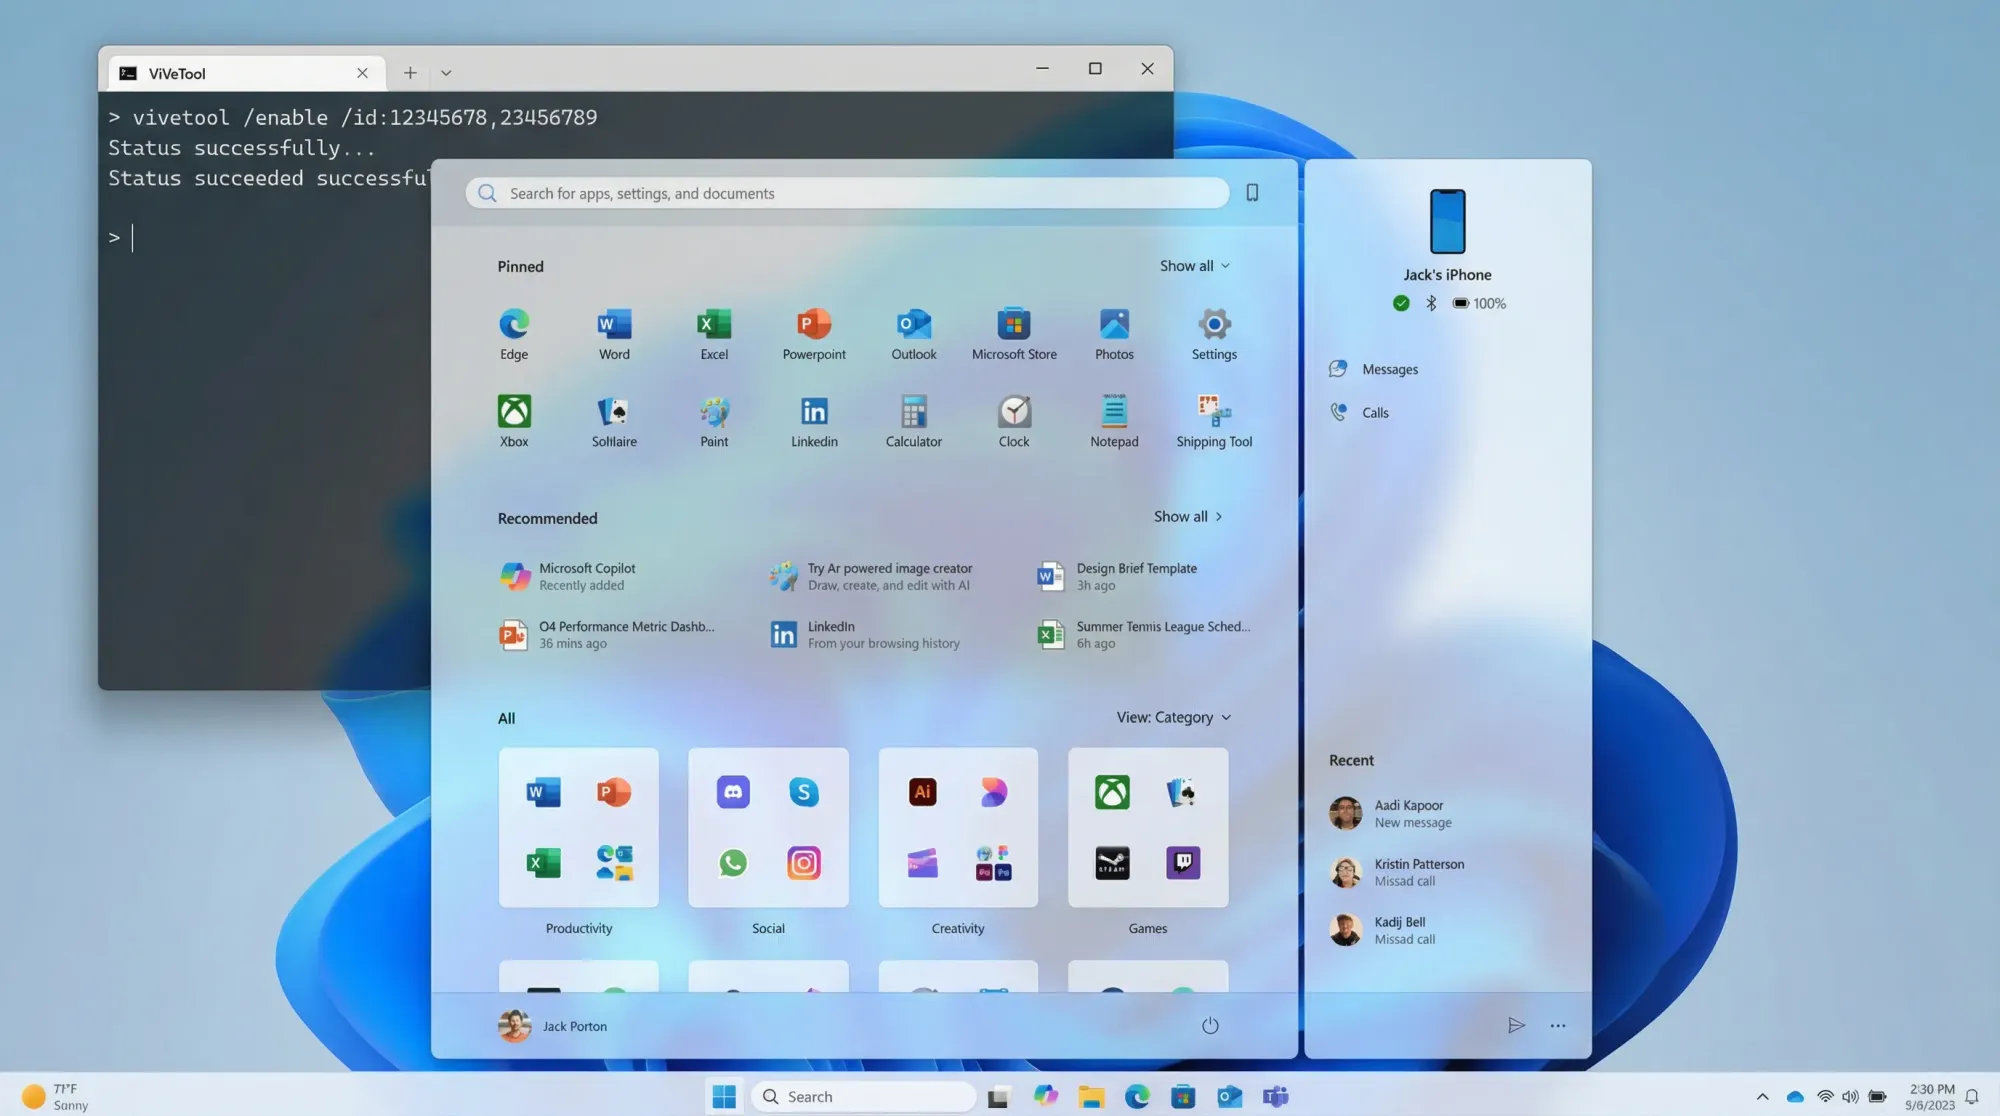
The new Start menu addresses years of user feedback about Windows 11's initial design. Microsoft consolidated multiple separate sections—Pinned, Recommended, and All Apps—into a single scrollable layout. Users now control whether promotional content appears, can switch between multiple view modes, and benefit from adaptive sizing that adjusts to screen dimensions.
Organizations managing Windows 11 deployments can activate the feature immediately across their fleet using ViVeTool, a feature flag management utility that bypasses Microsoft's phased rollout system.
Key Features of the Redesigned Interface
Single Scrollable Layout: Gone is the multi-section separation. All pinned applications, recommendations, and the complete apps catalog now appear on one continuous page, reducing navigation friction and improving discoverability.
Multiple View Modes: Users choose between three distinct presentation styles. The category view automatically groups applications by type—Productivity, Entertainment, Communication—placing related apps in proximity. The grid view displays applications in compact columns for quick scanning. List view presents applications in alphabetical order.
Adaptive Responsive Design: The interface adjusts column counts and section heights based on monitor dimensions. Large screens accommodate up to eight columns of pinned apps and six recommendation slots, while smaller displays compress to three to four columns while maintaining usability.
Recommended Section Toggle: Unlike previous Windows versions, users can completely hide or minimize the Recommended section through Settings, reducing Microsoft's promotional presence and reclaiming Start menu real estate for personal application organization.
Phone Link Integration: A new button near the search bar enables quick access to connected Android or iPhone content directly from Start, creating a unified entry point for smartphone file sharing and notifications.
Prerequisites and System Requirements
Verify Your Windows Version and Build
The new Start menu requires specific build versions. Open Settings > System > About and confirm your operating system details match these requirements:
Windows 11 Version 24H2: Requires build 26100.7019 or higher
Windows 11 Version 25H2: Requires build 26200.7019 or higher
If your current build falls below these versions, update immediately before proceeding.
Prepare Your Update Settings
Access Settings > Windows Update > Advanced Options and verify the toggle "Get the latest updates as soon as they're available" is enabled. This setting ensures you receive optional updates like KB5067036 rather than waiting for mandatory releases.
Click "Check for updates" and install KB5067036 if not already present. Allow the update process to complete fully before proceeding to the next section.
Obtain Administrator Privileges
ViVeTool requires administrator-level access to modify system feature flags. Ensure your user account belongs to the Administrators group. Right-click any application and confirm "Run as administrator" appears in the context menu—if this option is missing, your account lacks administrative privileges and cannot enable features using ViVeTool.
Step-by-Step Feature Activation
Step 1: Download and Extract ViVeTool
Navigate to the official ViVeTool GitHub repository and download the latest release. GitHub release pages display multiple file options; select ViVeTool-vX.X.X.zip (where X.X.X represents the version number) to obtain the command-line utility.
Extract the downloaded ZIP archive to a convenient location. Many administrators choose C:\ViVeTool for simplicity, though any accessible directory suffices. Extract all contents including ViVeTool.exe, configuration files, and supporting libraries into this directory.
Step 2: Open Windows Terminal with Administrator Elevation
Locate Windows Terminal in your Start menu search or taskbar. Right-click the application icon and select "Run as administrator" to open a command-line interface with elevated privileges.
Alternatively, press Windows key + X and select "Terminal (Administrator)" from the system menu for faster access.
Step 3: Navigate to the ViVeTool Directory
Within the administrator terminal window, change your active directory to where ViVeTool was extracted. Use the change directory command:
cd C:\ViVeTool
If you extracted ViVeTool to a different location, adjust this path accordingly. Press Enter to confirm the directory change. The command prompt now displays the ViVeTool directory path.
Step 4: Verify ViVeTool Installation
Type the following command to confirm ViVeTool is correctly installed and accessible:
.\ViVeTool.exe
Press Enter. If properly installed, the terminal displays ViVeTool version information and available command parameters. If an error message appears stating "file not found" or similar, verify your extraction directory matches your navigation command and retry.
Step 5: Execute Feature Activation Commands
Now activate the new Start menu features using feature IDs. Type the following command exactly as shown:
.\ViVeTool.exe /enable /id:47205210,57048231
These feature IDs correspond to:
47205210: The primary new Start menu interface with category views, grid layouts, and redesigned organization
57048231: Associated KB5067036 update features including adaptive display sizing and Phone Link integration
Press Enter to execute the command. Upon successful completion, the terminal displays the message "Successfully set feature configuration(s)" confirming that both features are now enabled.
Step 6: Restart Your System
Changes applied through ViVeTool require a system restart to take effect. Save any open work, close applications, and restart your computer:
shutdown /r /t 0
This command initiates an immediate restart. Alternatively, restart through the Start menu as you would normally.
After restart, log into your user account and navigate to the Start menu. The new interface should now appear with category-organized applications, responsive layout adjustments, and the toggle option to hide the Recommended section.
Verifying Feature Activation
Confirm the New Interface is Active
Once your system reboots and you access the Start menu, observe the following indicators confirming successful activation:
The application list now appears on a single scrollable page rather than separated across multiple menu tabs or screens. The Recommended section is visibly distinct but can be toggled off through Settings > Personalization > Start. Application categories appear automatically organized—for instance, Outlook displays under Productivity while games appear in Entertainment.
Check Feature Status with Query Command
If you want to verify feature status programmatically, open an administrator terminal and navigate to the ViVeTool directory, then execute:
.\ViVeTool.exe /query /id:47205210
The response displays a numeric status indicator:
0 (Default): Feature enabled by default (shows as Normal)
1 (Disabled): Feature explicitly disabled
2 (Enabled): Feature forcefully activated through ViVeTool
If the output shows "2 (Enabled)" or similar, your feature activation succeeded. If output shows "0 (Default)" despite executing the enable command, wait several minutes for background processes to finalize feature registration, then query again.
Test Feature Functionality
Interact with the new Start menu to confirm all features function correctly:
Click the View or Layout button (typically located near the search bar) and verify the option to switch between category, grid, and list views appears and changes the displayed layout appropriately. Toggle the Recommended section on and off through Settings > Personalization > Start and observe that the Start menu reorganizes space accordingly.
If you have an Android or iPhone connected to your PC via Microsoft's Phone Link app, observe that a phone icon appears near the search bar in Start, allowing direct access to phone content without opening a separate application.
Troubleshooting Common Issues
Issue: "Command Not Found" Error When Executing ViVeTool
Cause: The directory navigation command didn't execute correctly, or the file path doesn't match your extraction location.
Solution: Verify the exact directory where ViVeTool files exist. Open File Explorer, navigate to your extraction folder, and confirm ViVeTool.exe is visible. Copy the complete folder path from the address bar. Return to the terminal and execute cd "paste-your-copied-path-here" (include quotes around paths containing spaces).
Pro Tip: Use dir or ls commands to list directory contents and confirm ViVeTool.exe is present in your current location before attempting activation commands.
Issue: "Feature Not Found" When Executing Enable Command
Cause: Incorrect feature IDs specified, or build version is incompatible.
Solution: Verify your Windows build matches the requirements (26100.7019+ for 24H2 or 26200.7019+ for 25H2). Double-check that feature IDs are exactly 47205210 and 57048231 with no typos. Some builds may use slightly different ID numbers; if errors persist, search Windows forums for your specific build's feature ID.
Pro Tip: Copy the command from a reliable source and paste it into the terminal rather than manually typing to eliminate keystroke errors.
Issue: New Start Menu Does Not Appear After Restart
Cause: Feature activation completed but requires additional time for background services to complete registration, or the system didn't fully restart.
Solution: Restart your system again using the restart command or GUI. Some feature activations require multiple restart cycles. If the issue persists after two restarts, sign out of your account and sign back in—this sometimes triggers UI refreshes that desktop restarts miss.
Advanced Troubleshooting: Open Event Viewer (eventvwr.msc), navigate to Windows Logs > System, and search for errors related to ViVeTool or feature configuration. Error event codes beginning with "0x" indicate specific failures; search Microsoft's documentation for these codes.
Best Practices for Deployment
Testing Before Organization-Wide Activation
For IT administrators managing multiple systems, activate the feature on a test machine first. Confirm all functionality operates as expected, verify integration with your organization's active directory setup, and test with standard user accounts (not just administrator accounts).
Document any compatibility issues with third-party Start menu customization software. Some third-party utilities that modify the Start menu may conflict with the new interface.
Batch Automation for Organizational Rollout
Rather than manually executing ViVeTool on each workstation, create a deployment script for your systems management platform (SCCM, Intune, Group Policy):
# PowerShell script for automated Start menu activation
$ViVeToolPath = "C:\ViVeTool\ViVeTool.exe"
& $ViVeToolPath /enable /id:47205210,57048231
shutdown /r /t 300
This approach applies the feature across your organization in a controlled manner, with staged rollouts reducing risk of unforeseen issues. Test on pilot groups before organization-wide deployment.
Monitor Feature Adoption
Track adoption through telemetry. Windows diagnostic data reports whether the new Start menu interface is active. Monitor endpoint management tools for successful feature activation across your fleet.
Document the Process
Maintain internal documentation of your organization's ViVeTool activation process, including the specific commands executed, affected build versions, and any customizations applied. This documentation proves invaluable during staff transitions or troubleshooting future incidents.
Disabling the Feature (Rollback Procedure)
If the new Start menu causes compatibility issues or users prefer the previous interface, disable the features using:
.\ViVeTool.exe /disable /id:47205210,57048231
Restart your system to apply changes. Your Windows 11 installation reverts to the classic Start menu interface from before KB5067036.
Final Verification and Validation
Comprehensive Feature Test Checklist
After activation and restart, confirm the following functionality:
- [ ] Single scrollable Start menu appears (no separate tabs)
- [ ] Applications display in category view by default
- [ ] View switching button changes layout to grid and list modes
- [ ] Recommended section can be toggled off through Settings > Personalization > Start
- [ ] Pinned applications remain accessible and functional
- [ ] Search functionality works within the new interface
- [ ] Phone Link button appears if device is connected via Phone Link app
- [ ] Responsive layout adjusts appropriately when resizing the window
- [ ] No errors or crashes when interacting with the new interface
If all items pass verification, the feature activation is complete and successful.
Performance Baseline
Open Task Manager while the Start menu is visible and note the System memory utilization. Excessive memory consumption (over 500 MB) during Start menu interaction may indicate compatibility issues with system customizations or third-party software.
Conclusion
The new Windows 11 Start menu represents a meaningful evolution in the operating system's user experience. Category-based organization, multiple view options, and customizable sections address long-standing usability concerns. Rather than waiting for Microsoft's phased rollout schedule, IT professionals and enthusiasts can activate the feature immediately using ViVeTool.
The activation process is straightforward—update to the required build, download ViVeTool, execute the feature ID commands, and restart. Organizations should test thoroughly before deploying across large fleets, but individual users can activate confidently knowing the feature is fully supported and reversible.
For users who prefer the classic interface, rollback is simple—a single disable command restores the previous Start menu. For those embracing the improvements, the new interface integrates seamlessly with modern Windows 11 workflows.
Related reading: Windows 11 customization best practices, Group Policy Start menu configuration, and Intune feature management for Windows endpoints.
Sources
-
Microsoft Learn Documentation – Updating Windows 11 and Managing Features – https://learn.microsoft.com/en-us/windows/release-health/windows-11-overview
-
Windows Central – Microsoft Begins Rolling Out New Start Menu on Windows 11 (October 27, 2025) – https://www.windowscentral.com/microsoft/windows-11/microsoft-begins-rolling-out-new-start-menu-on-windows-11
-
Windows Report – Force Enable New Start Menu in Windows 11 25H2 and 24H2 with ViVeTool (October 29, 2025) – https://www.windowsreport.com/force-enable-new-start-menu-windows-11/
-
The Windows Club – How to Use ViVeTool on Windows 11 – https://www.thewindowsclub.com/how-to-use-vivetool-on-windows-11