
Prerequisites and Environment Requirements
Before attempting to bypass Microsoft account requirements, understand your setup environment and available options.
System and Network Considerations
Windows 11 standard installation media presents the Microsoft account requirement screen after initial setup steps complete. Your approach depends on whether the system has internet connectivity at setup time. Systems with internet access can use command-line methods; disconnected systems follow different bypass procedures.
Some manufacturer-supplied Windows 11 installations arrive pre-configured in S-Mode, which restricts the operating system to Microsoft Store applications and enforces Microsoft account login. S-Mode bypass procedures differ from standard Windows 11 bypass methods and require post-installation remediation.
Hardware and Installation Media Requirements
You need one of the following: the Windows 11 installation media (USB drive or ISO file), access to the system during setup, and administrative-level permissions during installation. For Rufus-based methods, prepare an 8GB or larger USB flash drive capable of being completely overwritten.
Windows 11 Build Considerations
Bypass commands vary across different Windows 11 builds released between 2021 and December 2025. Builds 22621 and earlier respond to the OOBE\BYPASSNRO command. Newer builds (26100 and later) require the start ms-cxh:localonly command. Both methods ultimately create local accounts without Microsoft authentication requirements.
Important Limitations
Windows 11 installations running in S-Mode cannot bypass Microsoft account requirements through standard methods. Additionally, systems where Microsoft account enforcement is configured through Group Policy (common in enterprise environments) may require administrative policy changes before local account creation succeeds.
Step-by-Step: Command-Line Bypass During Installation
This method uses Windows 11's setup interface and hidden command-prompt access to initiate local account creation.
Step 1: Begin Windows 11 Installation and Reach the Sign-In Screen
Boot the system from Windows 11 installation media. Follow the installation wizard through partition selection and initial system configuration. Progress through setup screens until reaching the account sign-in page where Windows asks for a Microsoft account or suggests creating one.
At this screen, the system is ready for the bypass procedure. Do not proceed with the Microsoft account prompt.
Step 2: Access the Command Prompt
Press the keyboard shortcut Shift + F10 simultaneously. This hidden keyboard combination launches Command Prompt within the Windows setup environment. The command prompt window appears overlaid on the setup interface.
This shortcut works across all recent Windows 11 builds and provides administrative-level command execution during setup before the operating system fully boots.
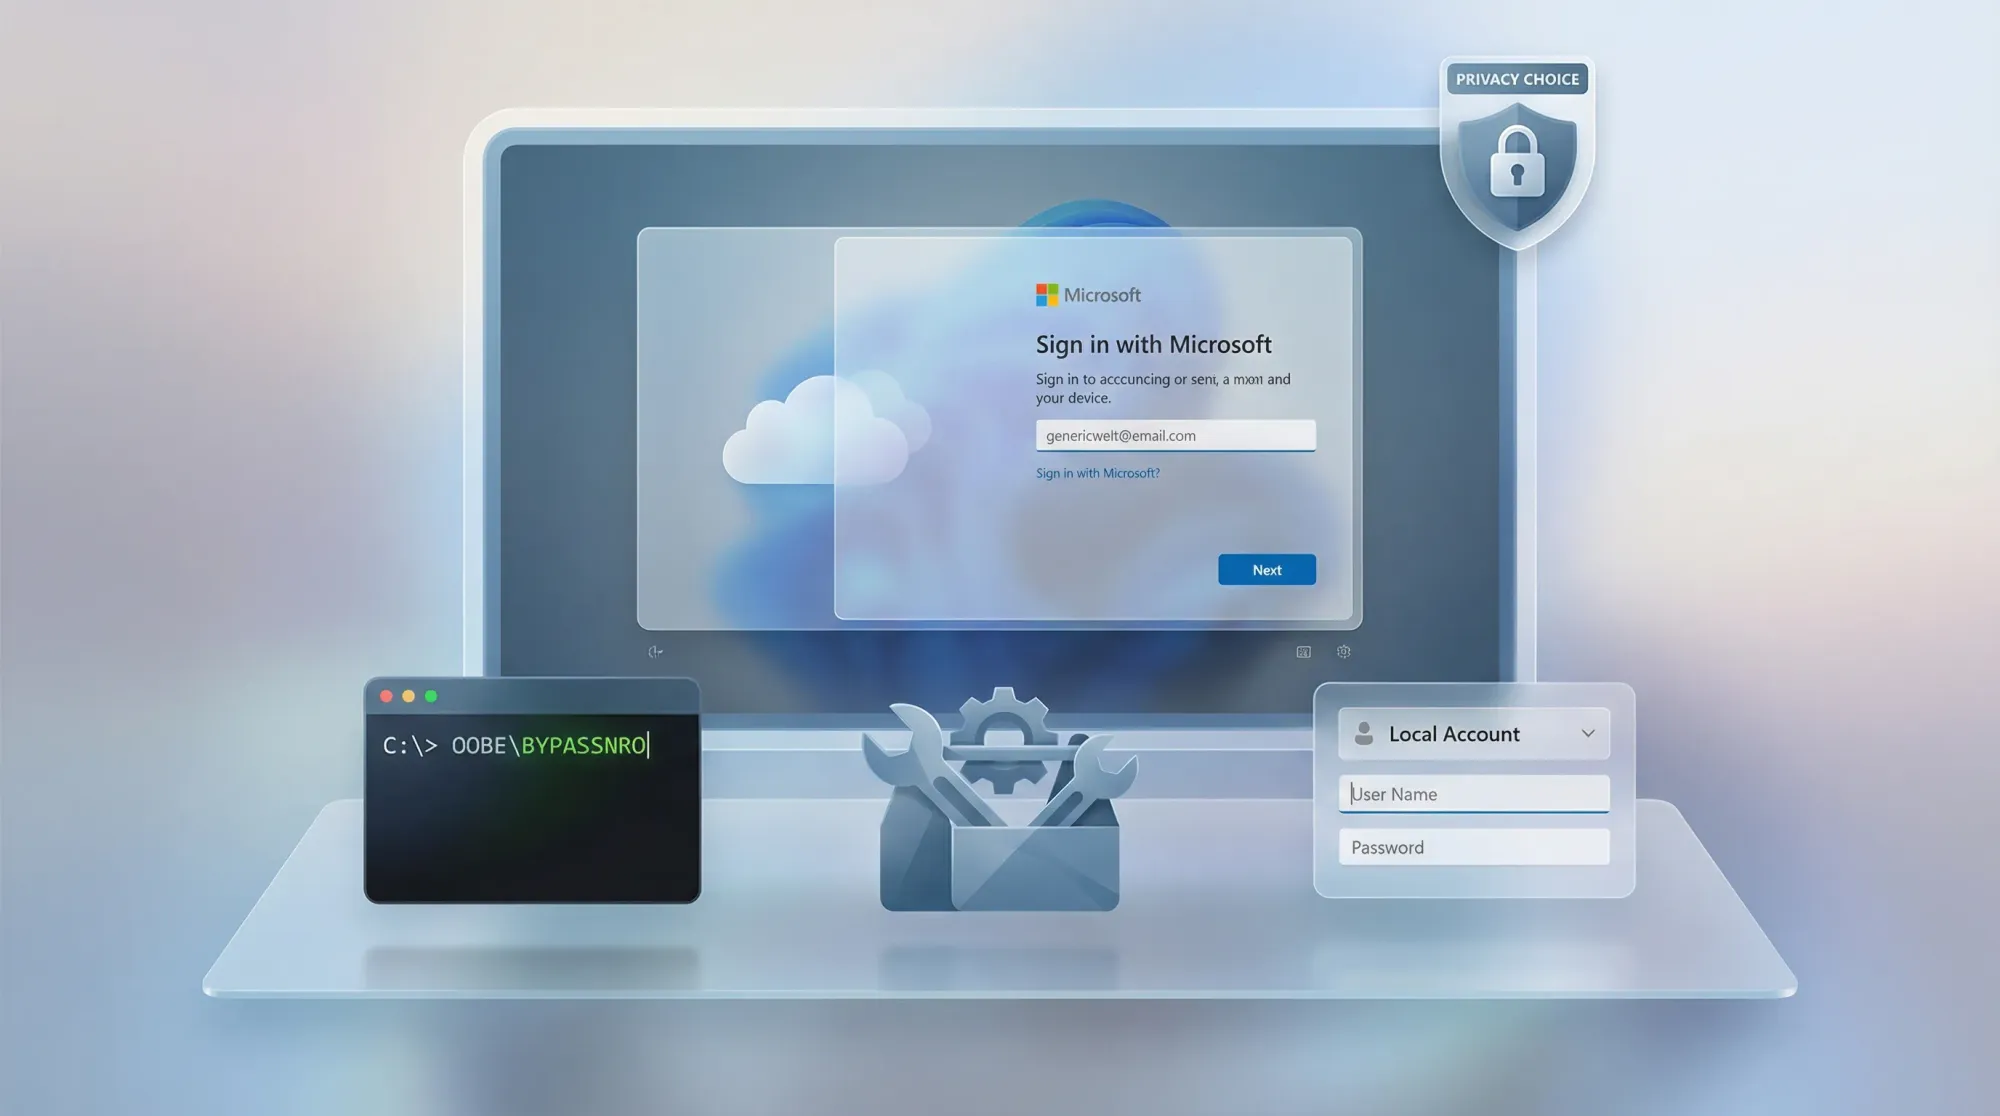
Step 3: Execute the Bypass Command
Type one of the following commands depending on your Windows 11 build:
For newer Windows 11 builds (26100 and later):
start ms-cxh:localonly
For older Windows 11 builds (22621 and earlier):
OOBE\BYPASSNRO
Press Enter to execute the command. The system processes the bypass command, which disables the requirement to connect to the internet and suppresses the mandatory Microsoft account screen.
For newer builds, a local account creation dialog appears immediately. For older builds, the system restarts and returns to setup without these requirements.
Step 4: Create Your Local Account
When the account creation dialog appears, enter your desired local account username. This username identifies your account within Windows and appears on the login screen.
Leave the password fields blank for a passwordless account, or enter a strong password twice for security. Passwordless accounts simplify setup but reduce security; local administrators should consider password protection.
Click Next to create the account and continue installation.
Step 5: Complete Windows Setup Offline
The setup wizard progresses to subsequent screens without requesting Microsoft account credentials or mandatory network connection. Privacy settings, regional configuration, and optional features continue normally.
Proceed through all remaining setup screens. Windows installation completes and the system boots to your newly created local account without any Microsoft account associations.
Step-by-Step: Offline Installation Bypass
This method disconnects the system from network connectivity during setup, which disables Microsoft account enforcement.
Step 1: Start Installation with Network Disabled
Begin Windows 11 installation. When the system reaches the network connection page, do not connect to the internet. If the system automatically connected to a network before setup, proceed to Step 2 to disable that connection.
Step 2: Disconnect from Network
For systems already connected to networks, access the command prompt using Shift + F10 and run:
ipconfig /release
This command releases any assigned IP address and disconnects the system from active network connections. Alternatively, physically disconnect the Ethernet cable or disable Wi-Fi through airplane mode or BIOS settings.
Step 3: Proceed Through Setup Without Microsoft Account
With the network disconnected, Windows displays the "I don't have internet" option on subsequent screens. Click this option to skip Microsoft account setup.
The system then displays "Continue with limited setup," which bypasses Microsoft account requirements and allows local account creation.
Step 4: Create and Configure Your Local Account
Enter your desired local account username and password when prompted. Configure privacy and regional settings according to your preferences.
Complete the installation process. The system boots directly to your local account desktop without any Microsoft cloud integration.
Step-by-Step: Rufus Pre-Installation Bypass
Rufus, a USB bootable media tool, can modify Windows 11 installation media to bypass Microsoft account requirements before setup begins.
Step 1: Download and Launch Rufus
Download Rufus version 4.4 or later from the official Rufus website. No installation is required; the application runs directly after download. Right-click the executable and select "Run as Administrator."
Windows displays a User Account Control prompt requesting elevated permissions. Click Yes to allow Rufus to run with administrative privileges.
Step 2: Configure Rufus Settings
Select your USB drive from the device dropdown menu. Click Select and browse to your Windows 11 ISO file.
In the Boot selection area, Rufus displays additional options specific to Windows installation. Locate and enable the following settings:
Toggle "Remove requirement for an online Microsoft account" to activate Microsoft account bypass in the installation media.
Optionally toggle "Create a local account with username" and enter your desired account name. This setting automates account creation during installation, eliminating the manual account creation step.
Step 3: Start the ISO Writing Process
Click Start to begin writing the modified Windows 11 image to the USB drive. Rufus warns that this process erases the USB drive. Confirm by clicking OK.
The writing process typically completes in 3–5 minutes depending on USB drive write speed. Rufus displays progress throughout the operation.
Step 4: Boot and Install Using Modified Media
Insert the Rufus-modified USB drive into the target system and boot from USB. The installation proceeds normally through partition selection and driver installation.
When reaching the account setup screen, the Microsoft account requirement is disabled. The system directly presents local account creation options without Microsoft login prompts.
Step-by-Step: Work-or-School Account Workaround
This official method uses Windows setup's "Set Up for Work or School" flow to enable local account creation.
Step 1: Select "Set Up for Work or School"
At the initial setup personalization screen, choose "Set Up for Work or School" instead of the standard consumer setup path.
Windows presents a different configuration flow designed for organizational deployments, which includes options for local account management.
Step 2: Access Sign-In Options
After selecting work-or-school setup, look for a "Sign-in Options" or "Domain Join Instead" button. Click this option.
This choice enables local account creation without requiring Microsoft account credentials, as organizational environments frequently operate independent of personal Microsoft accounts.
Step 3: Create Local Account
The setup process then allows direct local account creation. Enter your username and password, and complete setup without any Microsoft account requirement.
This method qualifies as an "official" bypass because it uses Microsoft's own setup flows, though not through the standard consumer path.
Troubleshooting Common Issues
Command Prompt Does Not Open with Shift + F10
Symptom: Pressing Shift + F10 produces no visible command prompt window.
Diagnosis: Keyboard layout differences or setup state incompatibility may prevent the shortcut from activating.
Resolution: Try alternative keyboard combinations. On some non-US keyboards, the equivalent shortcut may differ. Additionally, ensure you press Shift + F10 while the setup wizard displays, not during initial boot screens.
If the shortcut fails completely, restart the installation and try again at the account creation screen specifically.
Bypass Command Returns "Command Not Recognized"
Symptom: The bypass command executes but Windows indicates the command doesn't exist.
Diagnosis: The wrong command variant was used for your specific Windows 11 build, or typos appeared in the command.
Resolution: Verify which command applies to your Windows 11 build. Newer builds require start ms-cxh:localonly; older builds require OOBE\BYPASSNRO. Carefully retype the command with correct spacing and capitalization.
Microsoft Account Screen Reappears After Bypass
Symptom: The bypass command executed, but setup still displays the Microsoft account requirement.
Diagnosis: The system reconnected to network connectivity after the bypass, re-enabling the account requirement.
Resolution: Immediately after executing the bypass command, ensure the system remains disconnected from internet. Unplug Ethernet cables or disable Wi-Fi. For OOBE\BYPASSNRO command, the system restarts; ensure the network remains disconnected during and after restart.
S-Mode Prevents Local Account Creation
Symptom: Even after bypass methods, Windows enforces S-Mode and requires Microsoft account login.
Diagnosis: The system was shipped in Windows S-Mode, which restricts certain setup procedures.
Resolution: Complete setup with a temporary Microsoft account email address. After reaching the desktop, open the Microsoft Store, search for "Switch out of S Mode," and click Get to disable S-Mode. Once S-Mode is disabled, you can create a new local administrator account and delete the temporary Microsoft account.
Pro Tip: Keep a list of temporary email addresses available for S-Mode situations. After S-Mode disables, these temporary accounts can be safely removed.
Best Practices for Local Account Management
Security Considerations
Local accounts without passwords represent a significant security vulnerability. For any system handling sensitive data, organizational information, or containing valuable files, implement strong passwords on local accounts.
Ensure password complexity: minimum 12 characters, mixing uppercase and lowercase letters, numbers, and special characters. Update passwords periodically and avoid reusing credentials across multiple accounts.
Post-Installation Account Management
After completing Windows 11 setup with a local account, consider these configuration steps:
Enable Windows Defender and ensure it updates regularly. Local accounts do not inherit Windows Defender Offline signature updates from cloud services, making manual update verification important.
Configure Windows Update to automatic installation rather than user-prompted updates. Local accounts don't receive automatic background updates the same way cloud-connected accounts do.
Multi-Account Strategies for Households and Small Organizations
Systems used by multiple users should have individual local accounts rather than sharing a single account. Use Settings > Accounts > Other Users > Add Account to create additional local accounts for each user.
Designate one account as administrator for system-level changes; other user accounts can operate with standard permissions, reducing accidental system configuration changes.
Migration to Microsoft Accounts Later
If you initially create a local account but later want cloud integration, Windows allows account conversion. Settings > Accounts > Your Info > Sign in with a Microsoft Account initiates conversion, which links your local account data to a cloud Microsoft account without losing local files.
Final Verification and Post-Setup Validation
Confirm Local Account Status
After installation completes and you reach the desktop, verify that your account is truly local, not cloud-connected. Open Settings > Accounts > Your Info and check the account type.
The display should show "Local account" under your account name, with no Microsoft email address association. If an email appears, the local account setup did not complete successfully.
Alternatively, open Command Prompt and run:
net user
This command displays all local accounts on the system. Your newly created account should appear in the list. Cloud-connected accounts typically show different properties in advanced account queries.
Check Network Requirements Removal
Verify that Microsoft account requirements remain disabled for future installations or setup resets:
reg query "HKLM\SOFTWARE\Policies\Microsoft\Windows\System" /v DontRequireSigninOnC1
If output displays a value, the bypass was successful. This registry entry controls whether future setup prompts require sign-in.
Test System Functionality
Verify that all essential services and applications function correctly with your local account:
Test file access to Documents, Downloads, and Desktop folders.
Open Microsoft Edge and verify web browsing works normally.
Test Windows Defender activation and Update checking.
For domain-joined scenarios, verify network share access.
All functionality should operate normally. Local accounts have full access to Windows 11 features except cloud-specific services like OneDrive automatic sync and Microsoft account-specific services.
Conclusion
Windows 11's design emphasizes cloud-connected Microsoft accounts, but multiple legitimate methods allow system administrators and users to complete installation with local accounts instead. Command-line bypasses during installation, offline setup procedures, and Rufus pre-installation modifications all provide paths around mandatory Microsoft account requirements.
Organizations managing fleet deployments, privacy-focused users, and systems intended for offline operation all benefit from these techniques. Choose the method matching your environment: command-line shortcuts for immediate deployment, offline methods for disconnected scenarios, or Rufus automation for large-scale installations.
After successfully creating local accounts, implement appropriate security practices including strong passwords, regular Windows Updates, and monitoring through Windows Defender. Local accounts provide full Windows 11 functionality while maintaining user privacy and system independence.
Related guides: Windows 11 installation best practices, local account security hardening, and enterprise Windows deployment strategies.
Sources
-
Tom's Hardware – How to Install and Log In to Windows 11 Without a Microsoft Account – https://www.tomshardware.com/how-to/install-windows-11-without-microsoft-account
-
Windows Central – Setting Up Windows 11 Without a Microsoft Account – https://www.windowscentral.com/how-set-windows-11-without-microsoft-account
-
Microsoft Learn – Windows 11 Installation and Setup Documentation – https://learn.microsoft.com/en-us/windows/whats-new/windows-11-overview
-
GeeksforGeeks – How to Install Windows 11 Without a Microsoft Account – https://www.geeksforgeeks.org/techtips/install-win-without-a-microsoft-account/